GSKV3 Golf Management
Player's Manual


Before clicking the Log In button above, Read Instruction and enter your credentials provided by the league admin (the future Home of the site will soon change to Https://www.GSKV2.COM).
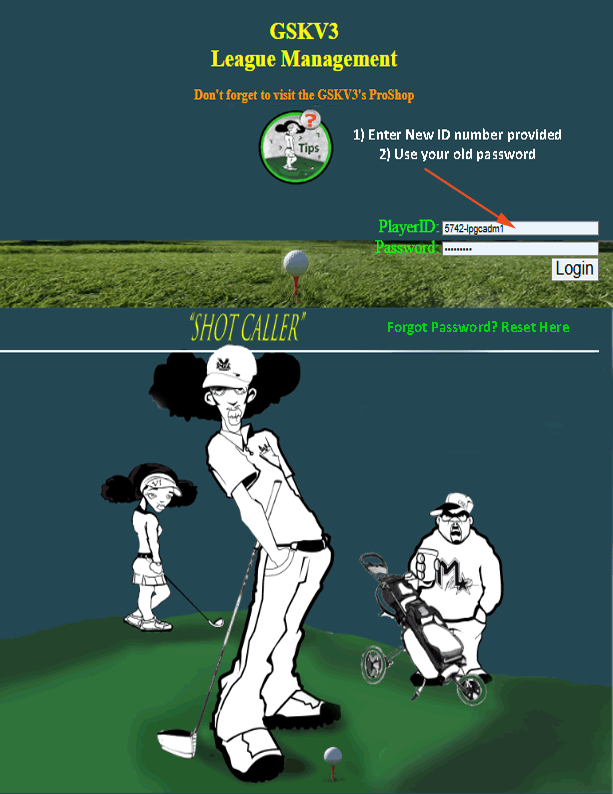
Click the Forgot Password (shown in the login form figure).
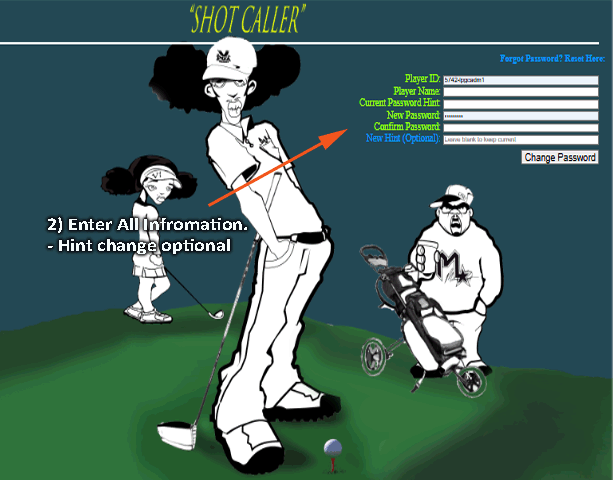
Fill in the following required fields as shown in figure below :

Click "Change Password" to submit the form.
🔒 Important:
- The password hint must match the one set by the admin.
- If you enter a new hint, it will replace the old one.
- Passwords are case-sensitive.
📸 Example:
Player ID: 1234-lpgc
Player Name: Smith, John
Current Hint: "Get from Administrator if it's your first time logging in and you have not made a change to hint".
New Password: [••••••••]
Confirm Password: [••••••••]
New Hint (Optional): "Favorite course"
If unsure of your current hint, contact us for additional help via your text message at our support number 8329382347.(Include Player ID. Your Golf Organization and phone number on file must match.)
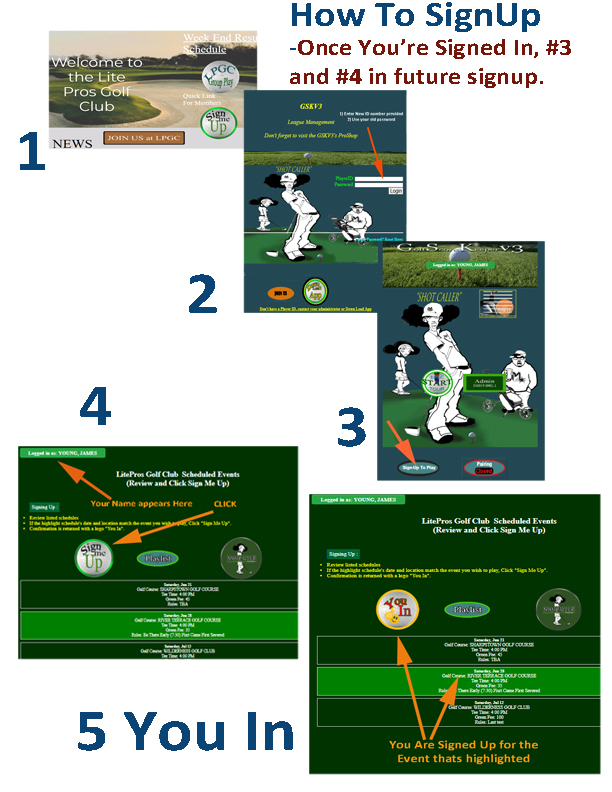
On the ShotCaller’s page, click the “Sign Up to Play” button (see arrow) and follow the step-by-step instructions in the chart below to add yourself to the event’s playlist.
Your organization may provide a direct link or an icon locate on the website's home page to access GSKV3. If not, go to gskv2.com and click “Login.”
Once you're signed in, you can view all scheduled events, players who have signed up (click the “Playlist button").
On the Playlist page, you can remove yourself from the event's playlist at any time by clicking “Remove” next to your name.
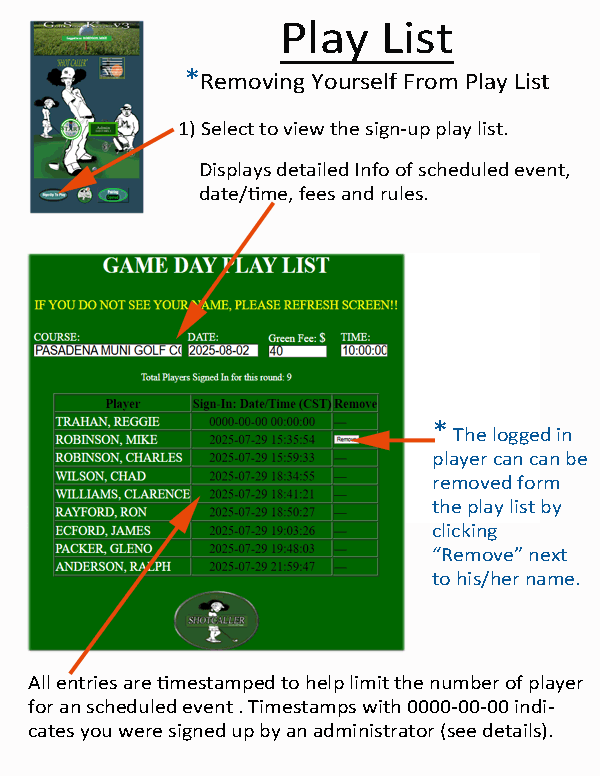
This page shows all players who have signed up for today’s round, along with the exact time they registered. You may remove yourself from the list at any time before play begins. Once sign-up closes, the list updates automatically. Each sign-up entry includes a timestamp to help manage group limits based on the number of slots provided by the golf club. A timestamp of 0000-00-00 indicates the player was added manually by an administrator. Many golf organizations also use these timestamps to maintain a standby list, allowing the next player in line to fill a spot if someone cancels. GOTO Playlist
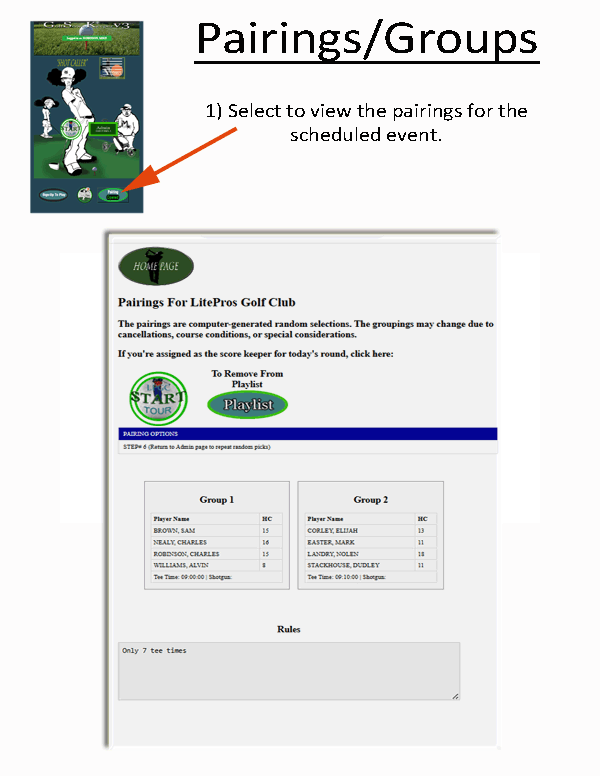
Shows your group, tee time, starting hole (shotgun starts), and handicap for scheduled round. Check the Pairings icon before play to know the rules of play , when and where you start. When the "Pairings" icon is disabled, admin will enable once groups/pairings is completed.
Your company business logo can be displayed as your “START TOUR” button to begin scorekeeping for your groups — Only player assigned to a group may record scores for that group.
On the admin playlist page, there’s an administrator icon labeled “Download Groups PDF” (shown below), which generates a printable PDF of the scheduled pairings. This file is typically emailed to the golf club pro.
"Print Icon" ⇒
Once logged in, you'll see your ShotCaller Menu Bar where you can click to select pre and post data, upcoming events, playlist, group assignments, and scoring history. Your login ID should be displayed at the top of the ShotCaller's Dashboard.
The ShotCaller's Dash Panel provides quick access to key features of the Golf Management App.
The ShotCaller's Dash Panel provides quick access to key features of the Golf Management App.
GSKV3 includes a built-in alarm messaging system that alerts players to important updates at the start of play and throughout the round. Any player logged into the GSKV3 app can set an alert. Use this feature to notify others of unexpected course conditions, weather changes, wildlife sightings, or other important information.

There are two ways to set an alert:
Alarm ON (status = 1): The alarm icon changes to the animated red “Alert On” image and begins flashing. An audible alert plays for up to three minutes or until the alert is cleared.
Alarm OFF (status = 0): The icon switches back to the green “Alarm Off” image, the flashing stops, and any active alert sound is silenced.
The first click on the page unlocks audio playback (required by most browsers) to ensure the alert sound can play when needed. Players can acknowledge or clear an alert by clicking the alarm icon and reviewing the posted message.
The ShotCaller's Dash Panel provides quick access to key features of the Golf Management App. Each button performs a specific task:
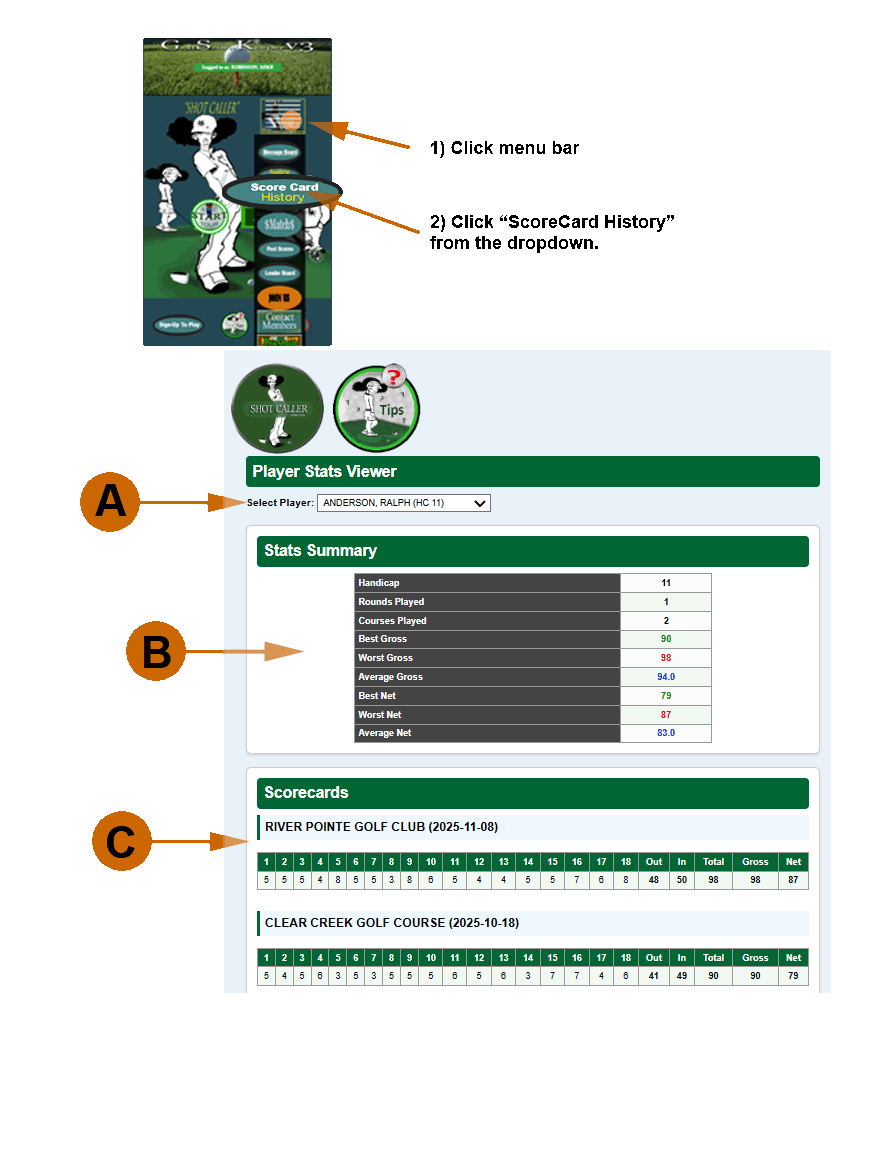
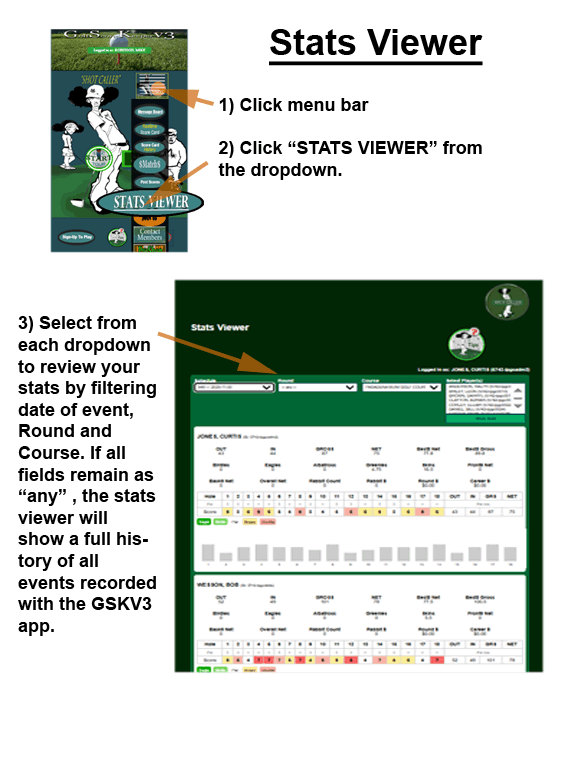
Review any player’s golf statistics, handicap, and complete score history. Use the steps below to navigate the Stats Viewer effectively.
Note: You must be logged in under a valid client account to view player data.
The ShotCaller's Dash Panel provides quick access to key features of the Golf Management App. Each button performs a specific task:
The ShotCaller's Dash Panel provides quick access to key features of the Golf Management App.
Shows CourseID and event_date for the latest schedule.
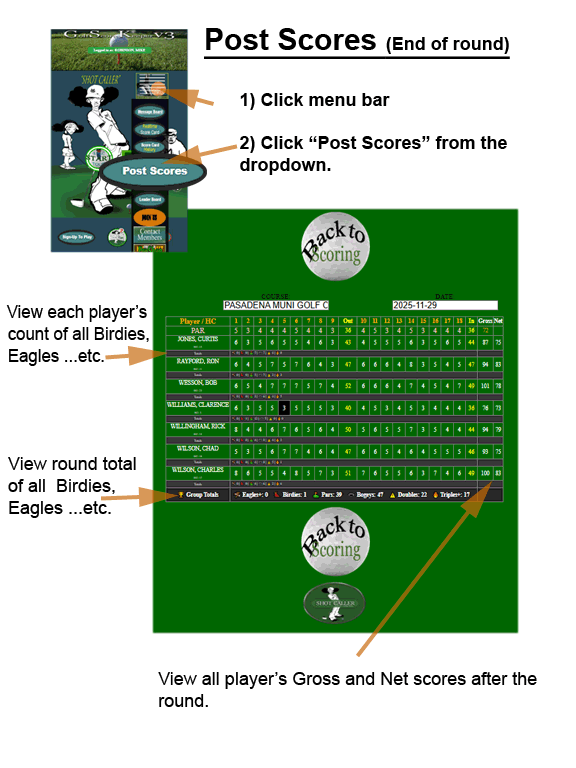
Shows all Player name, Handicap (HC), Strokes for holes 1–18, Out, In, Gross, Net totals
PAR row (pink/yellow)
Player rows with strokes
Background colors for scoring performance:
Eagle or better → red
Birdie → black
Par → normal
Bogey → normal
Double bogey → normal
Triple+ → normal
Under each player:
A “Totals” row with number of eagles, birdies, pars, bogeys, doubles, triples.
At the bottom:
A Group Totals row summing all players’ achievements.
The ShotCaller's Dash Panel provides quick access to key features of the Golf Management App. Each button performs a specific task:
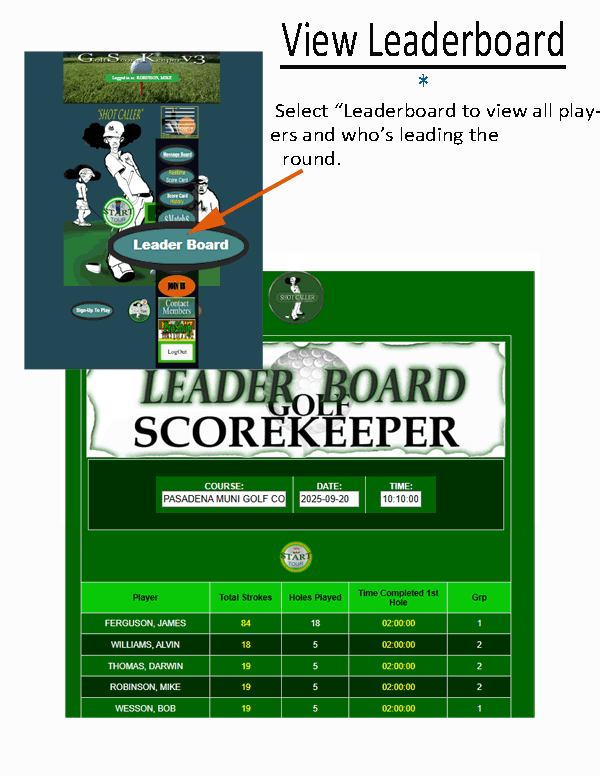
Scores update automatically as players enter strokes during play. The leaderboard ranks players by total strokes, holes completed, and the time they finished their first hole.
This page can only be viewed by logged-in players or admins with a valid session. Unauthorized users will be denied access.
The ShotCaller's Dash Panel provides quick access to key features of the Golf Management App. Each button performs a specific task:
This quick guide explains the two-part process required to join a league in GSKV3.
Before you can access the application, you must complete a simple "Not-A-Robot" security step. This ensures only real people submit join requests.

On the first screen, you will be asked to:
The join code is created from the image displayed on the screen. Each character has a number next to it (1–4). You must type the letters **in order of the numbers**.
If the image shows:
P (3) and H (1)
Then your code is: HP
Because 1 comes before 3.
Enter all four letters in the correct numerical order, then click: "I'm Not AI".
Once your code is accepted, you will be taken to the actual membership application.
After passing the join-code screen, you'll arrive at the full membership form. This form collects the information required by all Texas-based Golf Leagues using GSKV3.
Welcome aboard! We think you’re going to love your league experience.
The ShotCaller's Dash Panelallows you to **look up contact information** for any active GSKV3 golf member. You may also **update your own profile** using the “Update My Info” popup.
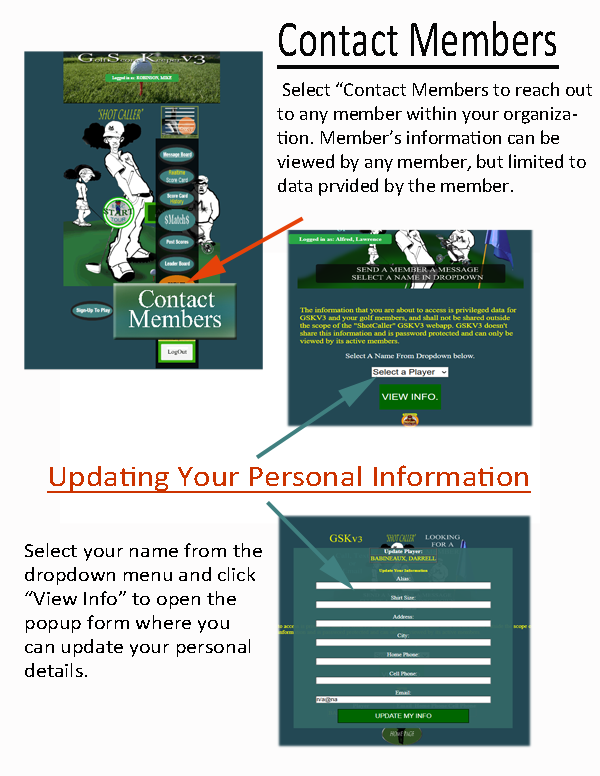
Tap the green **Home** button at the bottom of the page to return to the main menu.
All member information is protected and available only to registered users of the GSKV3 ShotCaller WebApp. Do not share this information outside your golf group.
We’re excited to announce the launch of our new Golf Pro Shop, powered through our Amazon-affiliated store AmazonLiving.shop.
Our Pro Shop gives members a convenient way to browse and purchase golf gear, accessories, and training essentials — all curated for golfers who want quality at a great price.
Every purchase made through our Pro Shop link helps support our golf community and allows us to continue improving GSK services, tools, and features.
Just click the “Golf Pro Shop” link on the homepage or menu to start browsing.
The ShotCaller's Dash Panel provides quick access to key features of the Golf Management App. Each button performs a specific task:
When you finish using the GSKV3 ShotCaller app, it is very important to log out properly. Logging out closes your session and helps protect your personal information, especially your contact details, schedule, and golf activity records.
This screen is used by the Score Keeper to confirm which players are physically present at the tee box before play begins.
It ensures the scorecard is accurate and that only confirmed players are included for the current round.
If you see a yellow Admin Mode banner, click “Switch to Player Mode” before continuing.
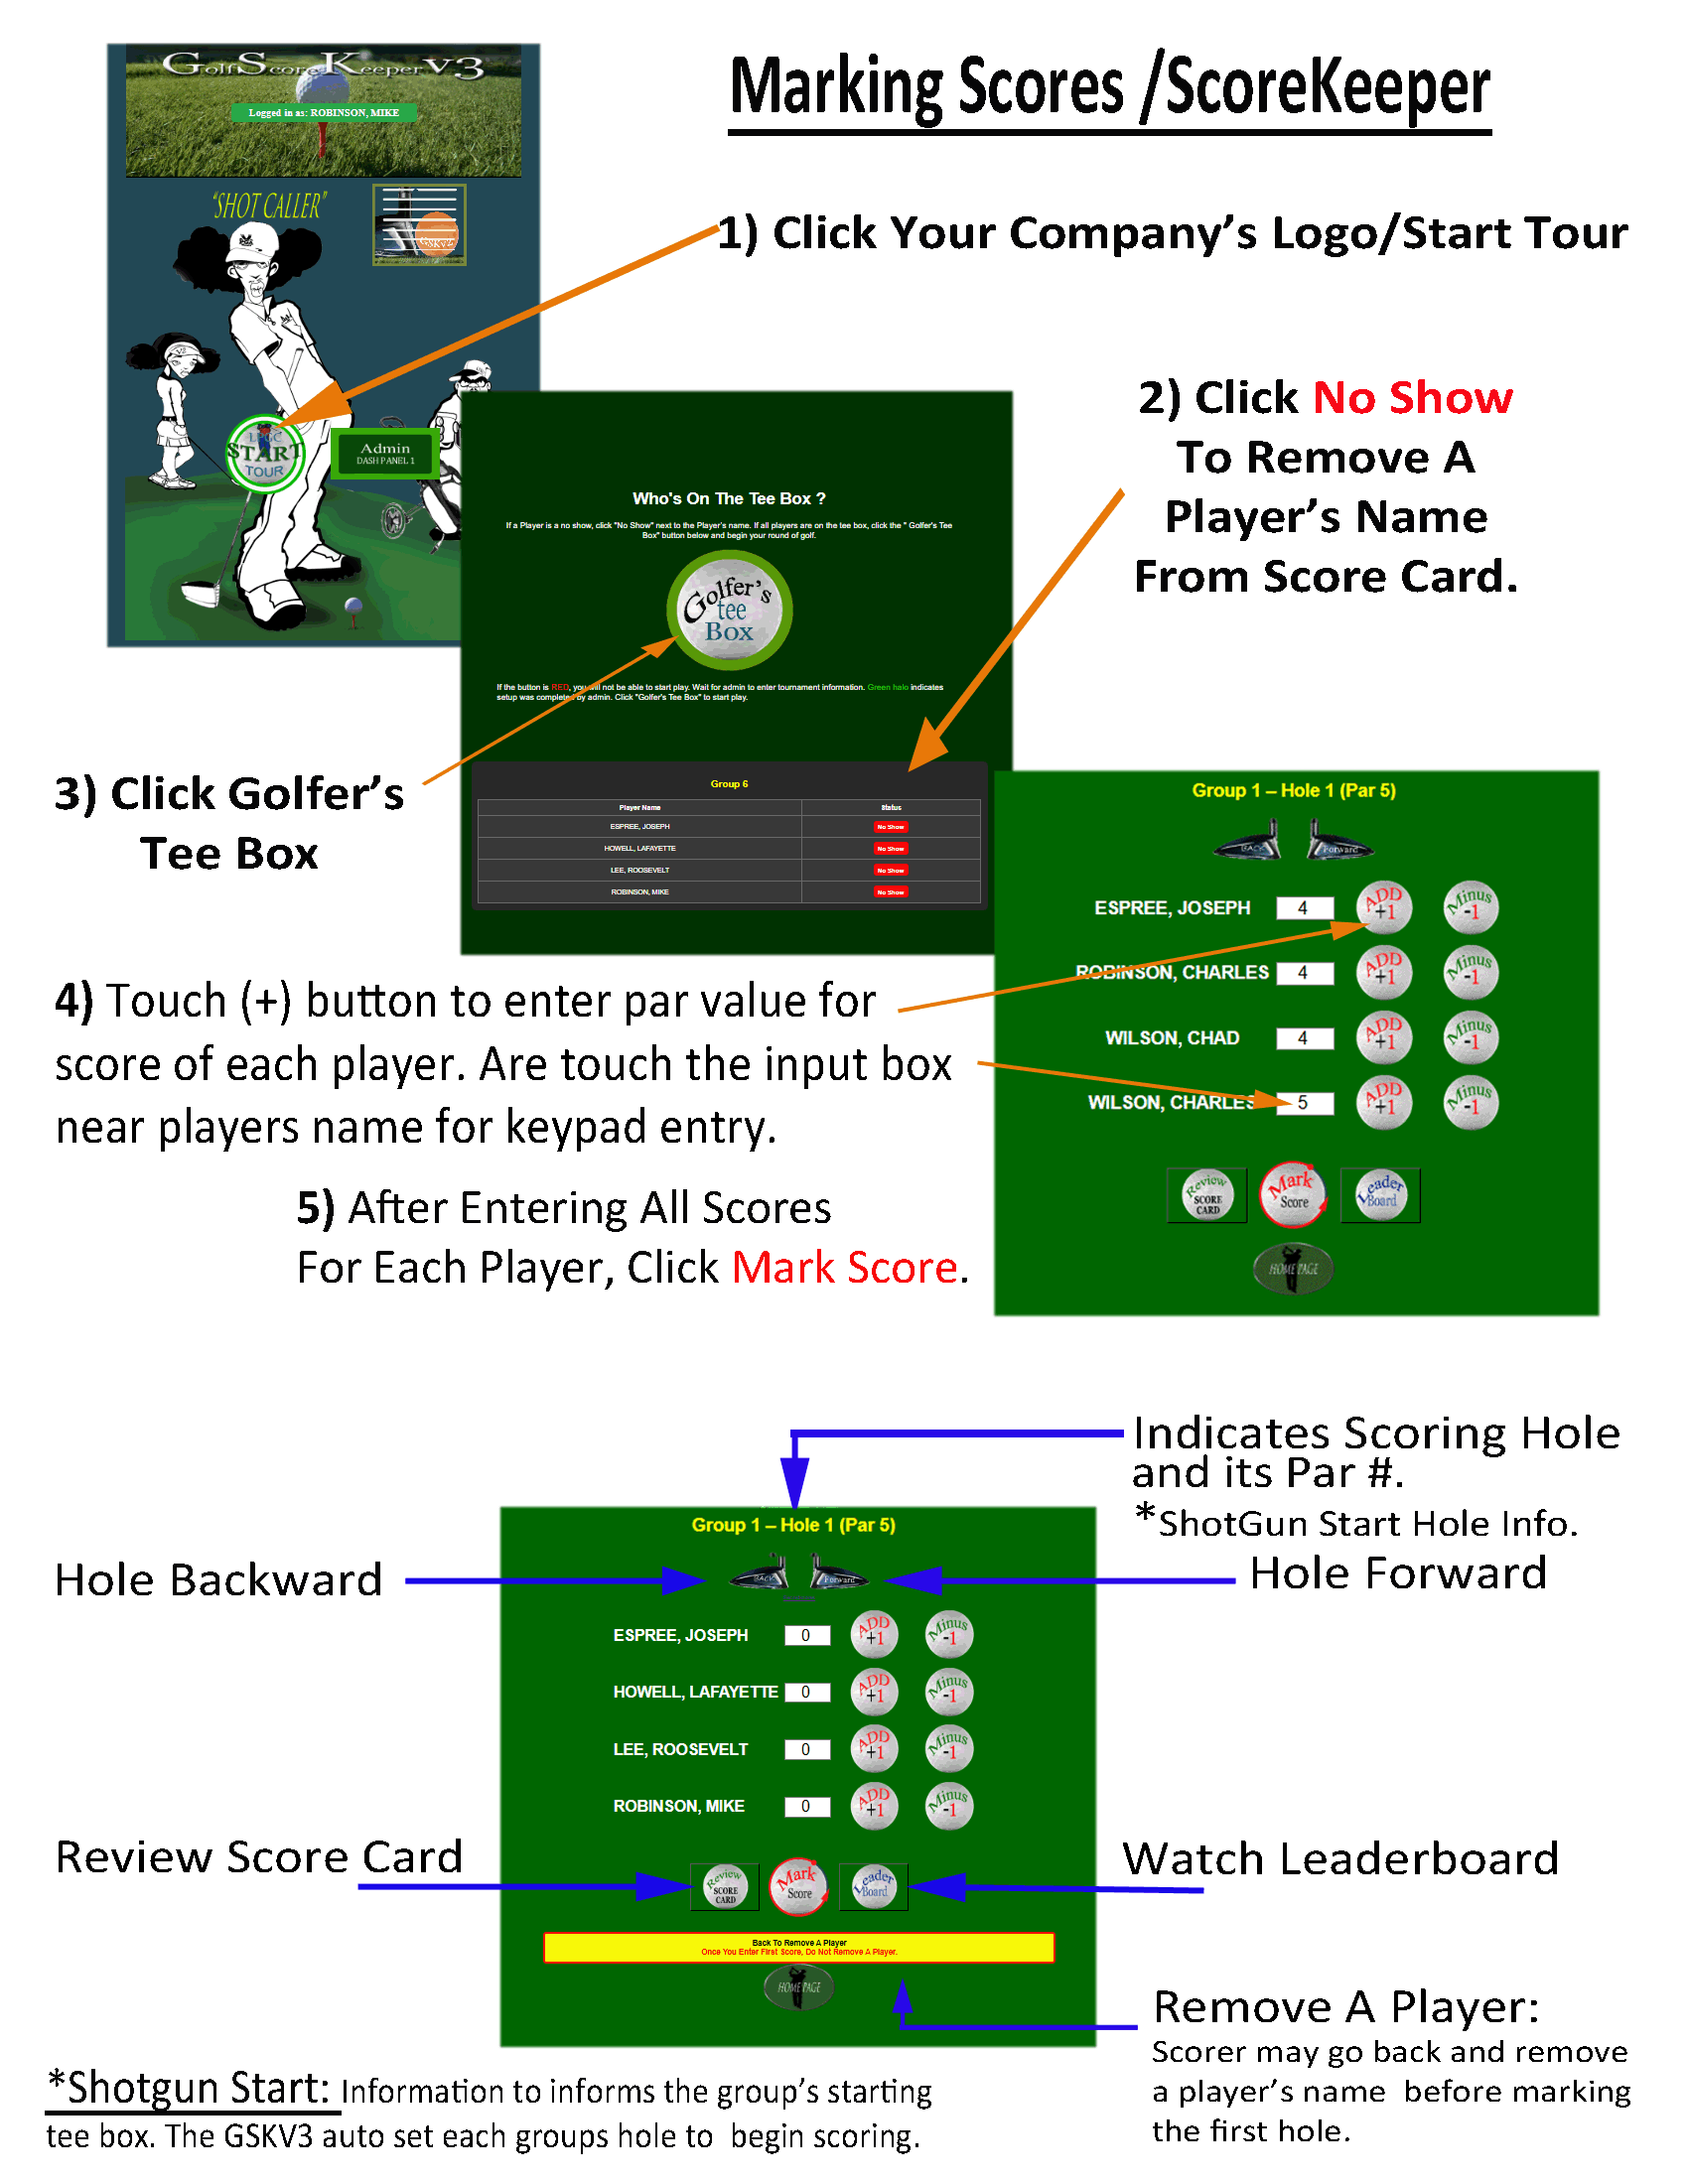
If a player does not arrive and needs to be replaced:
Once all players are confirmed at the tee box, click Golfer’s Tee Box to begin scoring.
Tip: Always save scores before changing holes to prevent data loss.
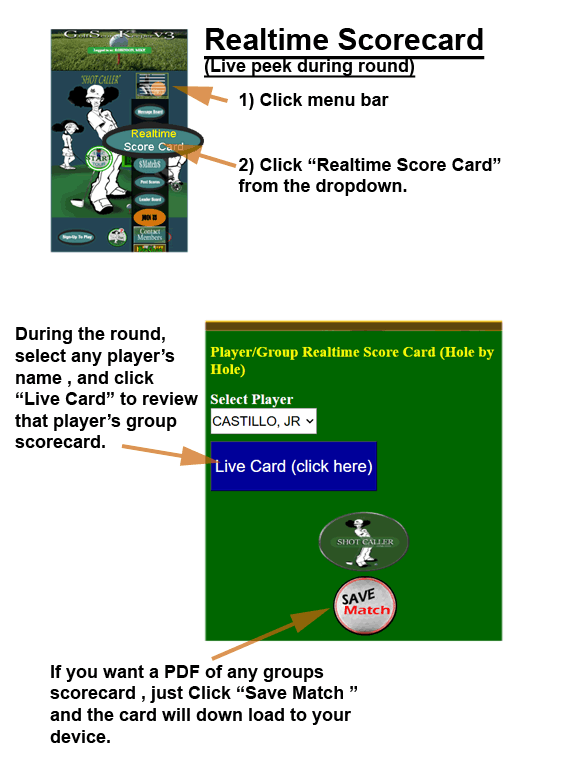
During and after a round, any player in the group—or an administrator—may review scores for accuracy. The Live Card Window allows you to view the scorecard in real time as strokes are entered for each hole. This feature streamlines score verification, minimizes errors, and greatly reduces the time needed to review and confirm the final scorecard at the end of the round.Record Scores.

This page shows your personal golf statistics, including scores, handicap, winnings, and performance by course. Only your own data is shown.
This section counts how many times you scored:
These totals include all non-deleted rounds.
✔ This page is read-only. Scores are entered by event or admin tools.
✔ Your stats update automatically after each completed round.
Source Explanation:
PlayerInfo = Less than 8 rounds played
Last 8 Rounds = Calculated from recent scores
Go to Stats Viewer
This page allows you to enter and submit your official golf scorecards for any non-tournament round played outside your organization. All scorecards submitted here are considered official once approved by an administrator, so please review your entries carefully before submitting.
Your Player Name is automatically filled in from your account and cannot be changed. This ensures that all scores are permanently linked to the correct player.
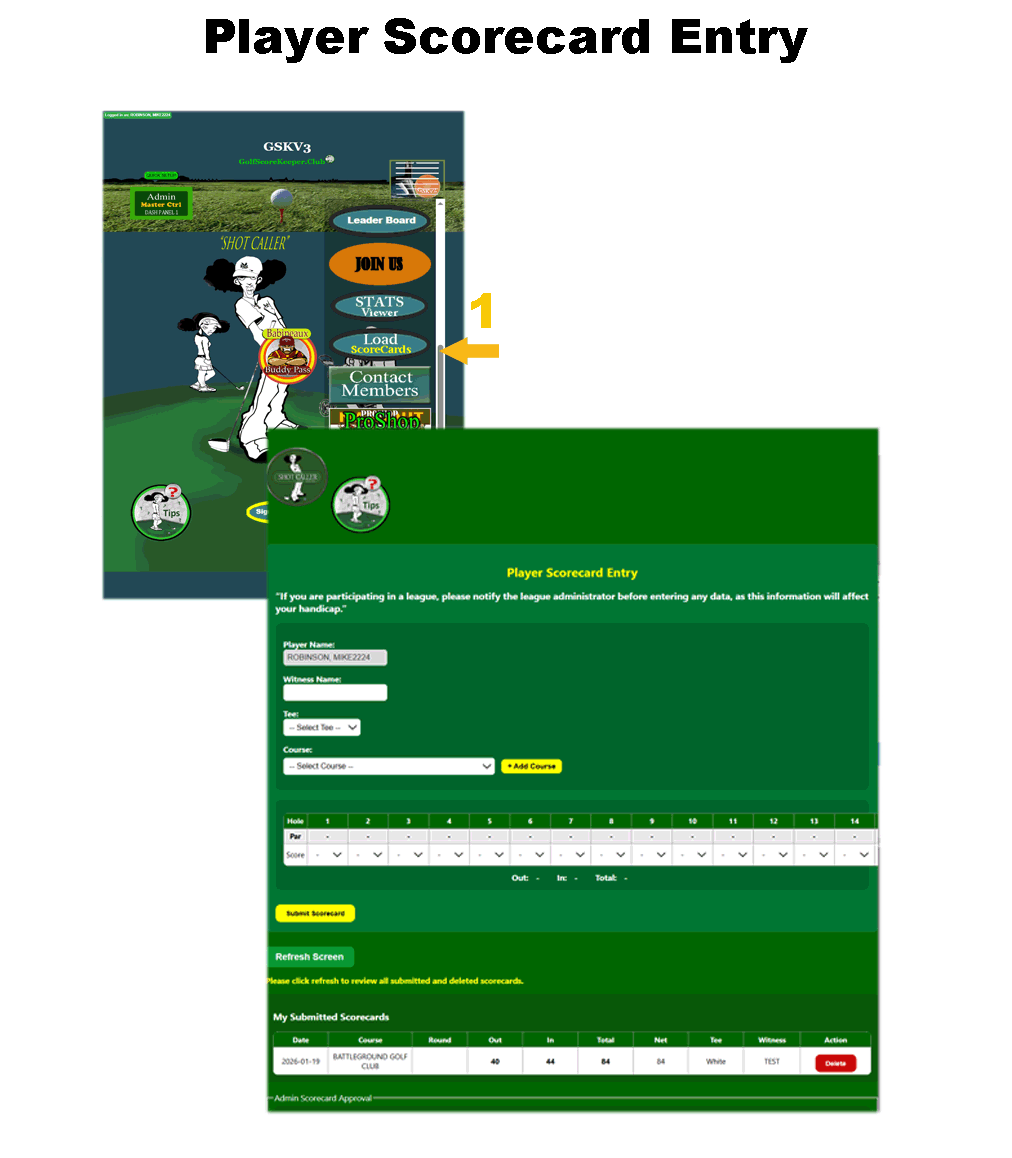 The Witness Name field is required. Enter the full name of the person who verified your
scorecard. A scorecard cannot be submitted without a witness, and once approved by an administrator,
it can no longer be edited or removed by the player.
The Witness Name field is required. Enter the full name of the person who verified your
scorecard. A scorecard cannot be submitted without a witness, and once approved by an administrator,
it can no longer be edited or removed by the player.
Use the Tee dropdown to select the tee box you played from. This information is used for reporting and validation purposes.
Select the Golf Course from the dropdown list. Once a course is selected, the par values for each hole will automatically display on the scorecard. These par values are provided for reference only and cannot be edited by the player. If the course you played is not listed, you may use the “Add Course” button to request that it be added by an administrator.
Enter your score for each hole using the dropdown provided under the Score row. Each hole requires a value before submission. Front nine, back nine, and total scores are calculated automatically when the scorecard is saved.
To prevent accidental duplicate submissions, the system restricts submitting multiple scorecards within a short time window. If you receive a duplicate submission message, please wait a few minutes before trying again.
After submission, your scorecard will appear in the My Submitted Scorecards section. While the scorecard is pending approval, you may remove it if you notice an error. Once an administrator approves the scorecard, it becomes locked and can no longer be viewed or deleted by the player.
Only scorecards submitted through this page and containing a witness name are eligible for removal by the player prior to approval.
If you believe a submitted scorecard requires correction after approval, please contact your league administrator for assistance.
Q: I forgot my password.
A: Use the password reset link or contact your admin to reset it (text 832.938. 2347).
Q: I can't see my group.
A: Make sure you're signed up for the current event and assigned to a group.
 –
–